Learn how to build a scalable and resilient system that helps run a futuristic coffee shop

Modern applications are fast, scalable, and cloud-based. They're also flexible due to the nature of the cloud and serverless, microservices, and other approaches. Though microservices were only developed at the very beginning of the cloud era, they quickly became a popular solution for cloud-native technologies due to their advantages, including:
- Easy scalability
- Isolation (data, failure, business logic, etc.)
- Compatibility with various programming languages and technologies
- Ease of deployment and release
However, despite these benefits, many developers have realized that incorporating microservices into their systems introduces some architectural trade-offs and technological challenges.
This post first explores some challenges associated with implementing microservice architecture before presenting event-driven architecture (EDA) as a possible solution to some of these challenges. You'll then learn how to implement event-driven microservices using Redpanda and Spring Boot.
Challenges of the microservices architecture
Using or migrating to microservices, especially without appropriate planning, can lead to some challenges:
- Service discovery and registry: Microservices need a service discovery mechanism, requiring a service registry technology to register and identify all microservices for communication.
- Access and communication: Unlike monolithic applications, which can import and use other services directly, microservices can only access other services through protocols like REST and JMS for communication.
- Logging and debugging: Each microservice generates its own logs, making tracking and issue investigation difficult. You'll need to implement a log aggregation system for effective debugging.
- Configuration: Each microservice should have its own configuration, and managing configurations for individual microservices can be complex. You need a centralized configuration system to handle these diverse microservice configurations.
- Security: Compared to a monolithic system, securing microservices poses challenges as each service might require unique security rules, complicating the overall security framework.
- Data storage: Microservices can employ various data storage architectures, such as sharded databases or the database-per-service approach, each with its own complexities.
A solution like a service registry can solve communication issues by making the microservices communicate through the REST protocol. However, this could lead to additional complexities related to resilience and fault tolerance.
Plus, if you opt for a database-per-service model in microservices, managing data transactions becomes complex as you'll need to pass the data from one microservice to another through your REST-based, request-driven system. Implementing event-driven architecture is one solution that can solve many of these issues.
Benefits of event-driven architectures
Event-driven architecture treats all data as events in the system and relies on capturing, transferring, processing, and persisting those events as needed. This approach offers two key models:
- Point-to-point: In this model, events flow through a pipeline between services.
- Publish-subscribe: In this model, events are published by one service and consumed by multiple subscribers.
Unlike synchronous request-driven systems, which may be error-prone and require a fallback mechanism to be fault-tolerant, event-driven architecture operates asynchronously, reducing microservices coupling and enhancing resilience.
Depending on the event backbone you use, it can enable event replay, which allows stored events to be resent in case of failure. A publish-subscribe mechanism can also have many subscriber services of the same kind, thus supporting scalability through loosely coupled mechanisms. These advantages make event-driven architecture a robust solution for microservices management.
In the following tutorial, you'll see how an event-driven system can make microservices more resilient, scalable, fault-tolerant, and efficient.
Tutorial: the coffee shop problem
Imagine that you work for a coffee shop that uses a software ordering system and robot baristas to make and serve coffee.
The coffee shop consists of two base microservices:
coffeeshop-service: This is the core coffee shop application, developed in Spring Boot. The customers use this system to place orders.coffeeshop-barista: Each robot barista uses one instance of thecoffeeshop-baristaservice, and the service defines their identity.
You want to add more baristas, but that would require more instances of coffeeshop-barista, and the system's current request-driven architecture prevents it from scaling. The system also has some resilience issues:
- When baristas switch shifts, the order system fails to carry customers' orders to the new barista, so the customers need to reorder.
coffeeshop-servicehas a rule that requires all orders to be ready in two seconds. However,coffeeshop-baristaexperiences a random delay, which can be a maximum of five seconds. If a robot barista experiences a random delay that lasts more than two seconds,coffeeshop-servicetimes out.
The following diagram shows the current architecture of the coffee shop system:
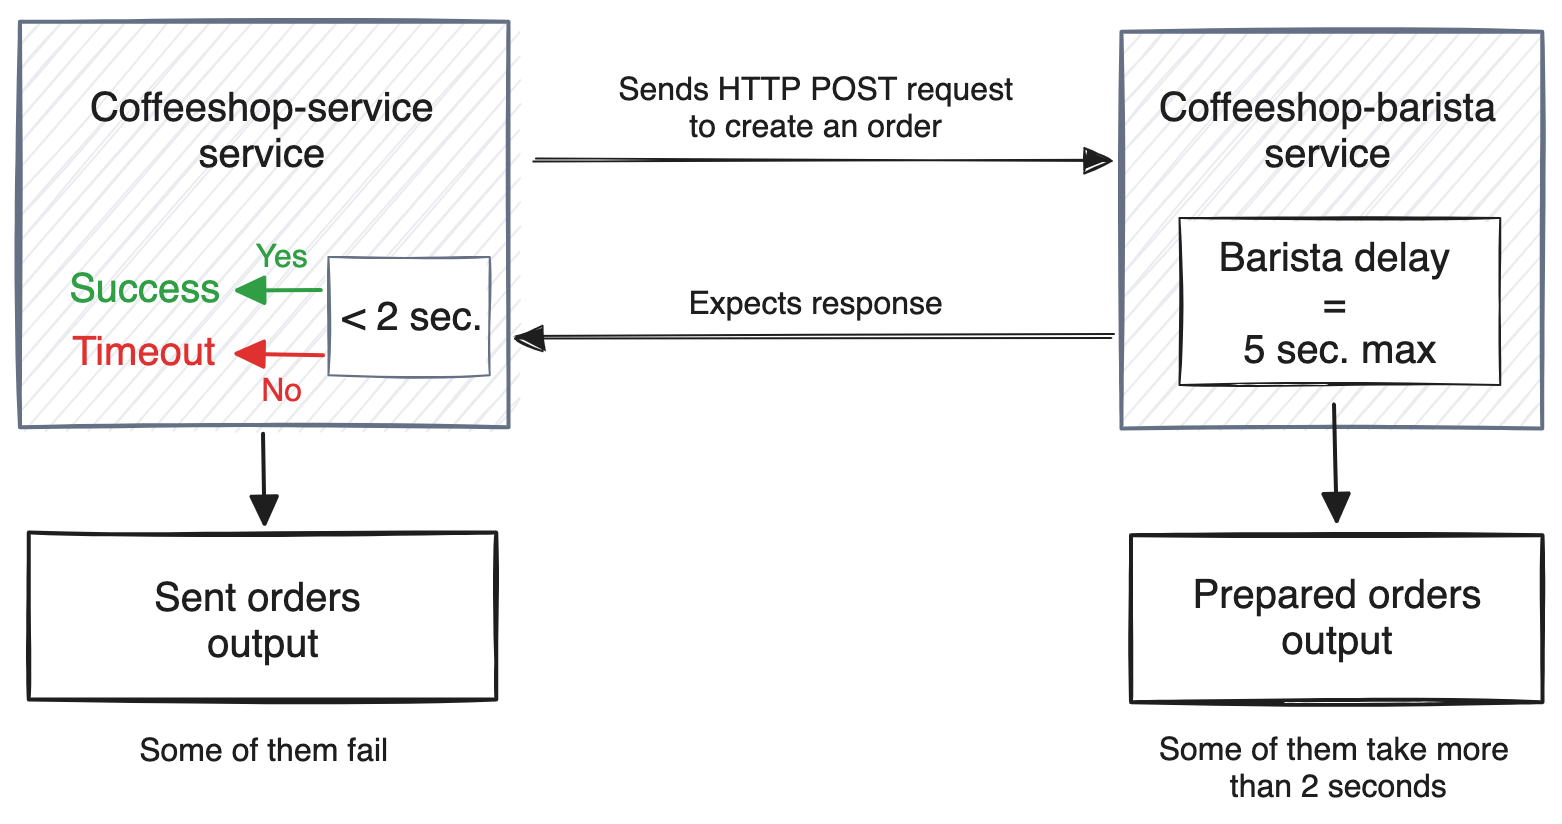
The coffee shop's current request-driven architecture
The company doesn't want to change these rules but would like to implement event-driven architecture on its system to make the system scalable and resilient at the same time. The objective is to prevent any order from being lost, regardless of the rules in place.
The following diagram illustrates what the company requires:
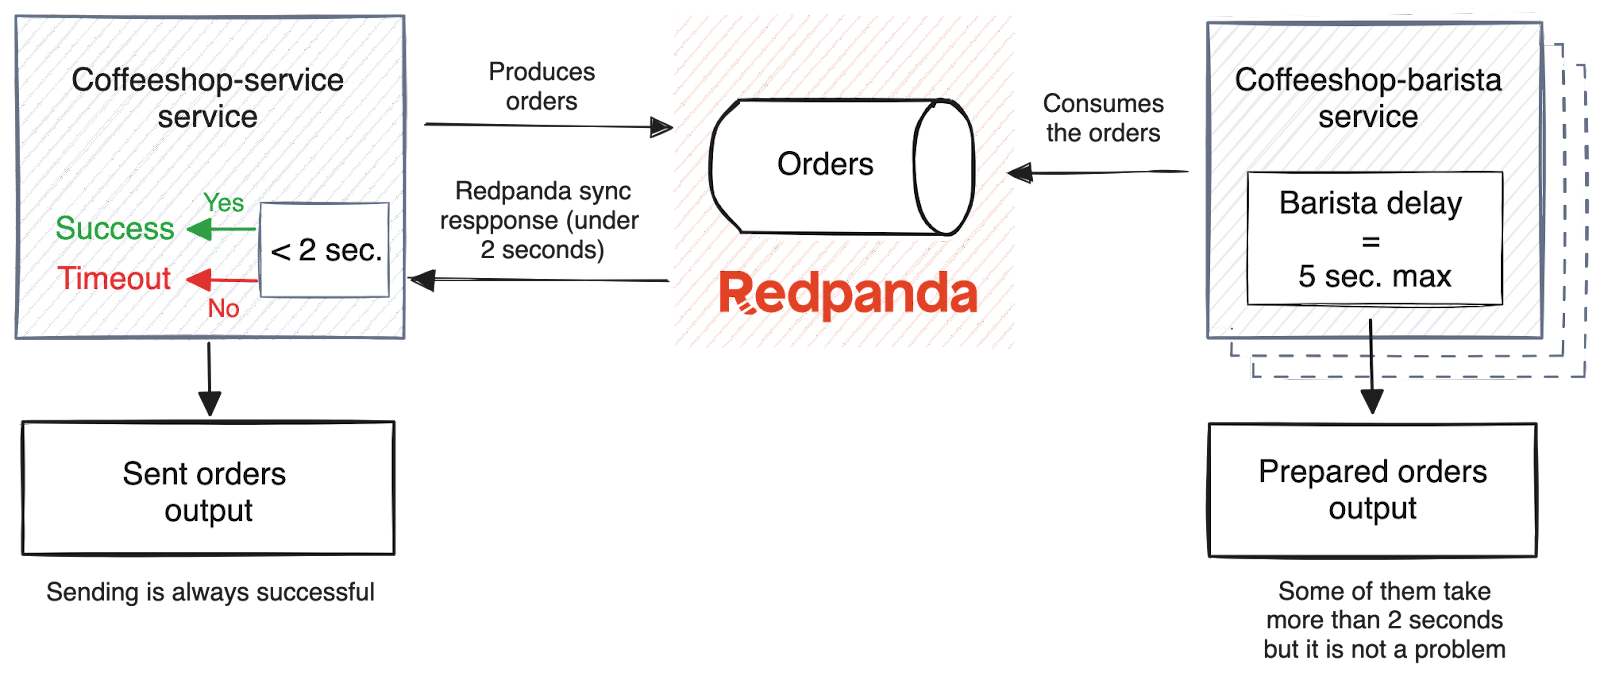
Proposed event-driven architecture for the coffee shop problem
Prerequisites
To complete the tutorial, you’ll need the following:
1. Examine the current request-driven system
Clone the repository of the codebase for this tutorial using the following command:
git clone https://github.com/redpanda-data-blog/2023-build-event-driven-microservices-spring-boot.git
Navigate to the redpanda-spring-boot-demo folder.
The directory structure should be as follows:
.
├── README.md
├── coffeeshop-barista
│   ├── mvnw
│   ├── mvnw.cmd
│   ├── pom.xml
│   └── src
├── coffeeshop-service
│   ├── mvnw
│   ├── mvnw.cmd
│   ├── pom.xml
│   └── src
└── scripts
    └── create_batch_orders.sh
Navigate to coffeeshop-service and run the following command to run the coffeeshop-service microservice:
./mvnw spring-boot:run
The successful output should be as follows:
... output omitted ...
2023-10-23T21:37:08.682+03:00  INFO 75895 --- [           main] o.s.b.w.embedded.tomcat.TomcatWebServer  : Tomcat initialized with port(s): 8080 (http)
2023-10-23T21:37:08.695+03:00  INFO 75895 --- [           main] o.apache.catalina.core.StandardService   : Starting service [Tomcat]
2023-10-23T21:37:08.695+03:00  INFO 75895 --- [           main] o.apache.catalina.core.StandardEngine    : Starting Servlet engine: [Apache Tomcat/10.1.13]
2023-10-23T21:37:08.836+03:00  INFO 75895 --- [           main] o.a.c.c.C.[Tomcat].[localhost].[/]       : Initializing Spring embedded WebApplicationContext
2023-10-23T21:37:08.837+03:00  INFO 75895 --- [           main] w.s.c.ServletWebServerApplicationContext : Root WebApplicationContext: initialization completed in 1039 ms
2023-10-23T21:37:09.215+03:00  INFO 75895 --- [           main] o.s.b.w.embedded.tomcat.TomcatWebServer  : Tomcat started on port(s): 8080 (http) with context path ''
2023-10-23T21:37:09.225+03:00  INFO 75895 --- [           main] c.s.demo.CoffeeshopServiceApplication    : Started CoffeeshopServiceApplication in 1.934 seconds (process running for 2.325)
Notice that the coffeeshop-service microservice is accessible via port 8080.
Open a new terminal and navigate to the other microservice directory, coffeeshop-barista. Run the following command to start the application:
./mvnw spring-boot:run
The successful output should be as follows:
2023-10-23T21:47:59.709+03:00  INFO 77893 --- [           main] o.s.b.w.embedded.tomcat.TomcatWebServer  : Tomcat initialized with port(s): 8081 (http)
2023-10-23T21:47:59.720+03:00  INFO 77893 --- [           main] o.apache.catalina.core.StandardService   : Starting service [Tomcat]
2023-10-23T21:47:59.720+03:00  INFO 77893 --- [           main] o.apache.catalina.core.StandardEngine    : Starting Servlet engine: [Apache Tomcat/10.1.13]
2023-10-23T21:47:59.820+03:00  INFO 77893 --- [           main] o.a.c.c.C.[Tomcat].[localhost].[/]       : Initializing Spring embedded WebApplicationContext
2023-10-23T21:47:59.821+03:00  INFO 77893 --- [           main] w.s.c.ServletWebServerApplicationContext : Root WebApplicationContext: initialization completed in 936 ms
2023-10-23T21:48:00.160+03:00  INFO 77893 --- [           main] o.s.b.w.embedded.tomcat.TomcatWebServer  : Tomcat started on port(s): 8081 (http) with context path ''
2023-10-23T21:48:00.170+03:00  INFO 77893 --- [           main] c.s.demo.CoffeeshopBaristaApplication    : Started CoffeeshopBaristaApplication in 1.739 seconds (process running for 2.078)
You can see that the coffeeshop-barista microservice is accessible via port 8081. Keep the terminal windows open.
Open a new terminal window and navigate to the root of the redpanda-spring-boot-demo folder. Run the following command to test the microservices:
chmod a+x ./scripts/create_batch_orders.sh; ./scripts/create_batch_orders.sh
The script creates batch orders through an HTTP POST request to the coffeeshop-service microservice. This microservice calls coffeeshop-service via HTTP REST and requests that the order be prepared.
The output should be similar to the following:
...output omitted...
Order sent: Order{product='Caffe Latte', name='Franz Kafka', orderId='6'}
Order sent: Order{product='Caffe Latte', name='Kaiser Soze', orderId='7'}
Exception: I/O error on POST request for "http://localhost:8081/orders": Read timed out
Exception: I/O error on POST request for "http://localhost:8081/orders": Read timed out
Exception: I/O error on POST request for "http://localhost:8081/orders": Read timed out
Order sent: Order{product='Caffe Latte', name='Aykut Bulgu', orderId='11'}
Order sent: Order{product='Filter Coffee', name='Franz Kafka', orderId='12'}
Exception: I/O error on POST request for "http://localhost:8081/orders": Read timed out
Order sent: Order{product='Americano', name='Mazer Rackham', orderId='14'}
Exception: I/O error on POST request for "http://localhost:8081/orders": Read timed out
Order sent: Order{product='Espresso', name='Takeshi Kovacs', orderId='16'}
Exception: I/O error on POST request for "http://localhost:8081/orders": Read timed out
...output omitted...
Some of the order requests above failed. This is because of the previously mentioned two-second rule, which the company doesn't want to change. Instead of changing any rules, you should implement the proposed architecture, which leverages EDA for microservices communication.
2. Implement the event-driven architecture
In each of their terminals, stop both microservices by pressing Ctrl+C or Command+C, depending on your operating system. Keep all the terminal windows open.
Navigate to coffeeshop-service in your repository and open the pom.xml file in the root directory of the application.
You can use an IDE of your choice for this tutorial.
Within the file, find the TODO comment and replace it with the following code snippet:
<dependency>
    <groupId>org.springframework.kafka</groupId>
    <artifactId>spring-kafka</artifactId>
</dependency>
This adds the required dependency for the Apache Kafka® integration with Spring Boot.
Navigate to the src/main/resources directory and open the application.properties file. This file contains the application's required configuration, such as the port, timeout, and barista service URL. You also need to place your Kafka configuration within this file.
To do this, replace the TODO line with the following snippet:
spring.kafka.bootstrap-servers=localhost:9092
spring.kafka.producer.value-serializer=org.springframework.kafka.support.serializer.JsonSerializer
This spring.kafka.bootstrap-servers configuration sets the bootstrap server address for Redpanda.
Note that you must have a Redpanda instance running with the bootstrap server configuration
localhost:9092.
The spring.kafka.producer.value-serializer defines the serializer class, which Kafka uses to serialize the Order model in the com.systemcraftsman.demo.model package.
For more information about Kafka serialization, you can visit the Data Types and Serialization section in the Kafka documentation.
Now that the coffeeshop-service application is Kafka-enabled and configured to use your Redpanda instance, you can update the CoffeeshopService class to use the Kafka client.
Open the CoffeeshopService.java class, which is in the com.systemcraftsman.demo package under the src/main/java directory. You'll see there are two TODO comments. The first comment marks where a RestTemplate instance needs to be replaced with a KafkaTemplate instance. The second comment is for using the same KafkaTemplate instance to send the messages to the orders Redpanda topic. So, instead of doing an HTTP POST call with RestTemplate, you will send a message to Redpanda.
To address both of these comments, replace the class content with the following snippet:
@Autowired
private KafkaTemplate<String, Order> kafkaTemplate;

public void sendOrder(Order order) {
    kafkaTemplate.send("orders", order.getOrderId(), order);
}
Be sure to include all the related Java import statements and remove the ones that are not required. With these changes, you've enabled coffeeshop-service to send orders through Redpanda.
You also need to update the coffeeshop-barista application to process any orders received from Redpanda. Navigate to the coffeeshop-barista directory and open the pom.xml file. Find the TODO line and replace it with the following, as you did for coffeeshop-service:
<dependency>
    <groupId>org.springframework.kafka</groupId>
    <artifactId>spring-kafka</artifactId>
</dependency>
Navigate to src/main/resources and open the application.properties file to change the application configuration. Replace the TODO line with the following code snippet:
spring.kafka.bootstrap-servers=localhost:9092
spring.kafka.consumer.auto-offset-reset=latest
spring.kafka.consumer.value-deserializer=org.springframework.kafka.support.serializer.JsonDeserializer
spring.kafka.consumer.properties.spring.json.trusted.packages=*
Like coffeeshop-service, coffeeshop-barista needs the bootstrap server address to access Redpanda, so you must define the spring.kafka.bootstrap-servers value.
The spring.kafka.consumer.auto-offset-reset=latest configuration ensures the application starts reading from the latest offset of a partition.
You might remember that the order value is serialized in coffeeshop-service, which sends the serialized value to the Redpanda topic. The coffeeshop-barista service deserializes the order value to a Java object by using the spring.kafka.consumer.value-deserializer configuration.
You can find more info in the Consumer Configs part of the Kafka documentation.
Navigate to the BaristaService.java class file in the com.systemcraftsman.demo package under src/main/java. This package contains another TODO that tells you to annotate the process method with the @KafkaListener annotation so that you can receive orders from the related Redpanda topic. Replace the TODO line with the following code snippet:
@KafkaListener(topics = "orders", groupId = "baristas")
The process method should look as follows:
   @KafkaListener(topics = "orders", groupId = "baristas")
    public void process(Order order) {
        prepare(order);
    }
Be sure to add the relevant Java imports.
The process method is directly called by the BaristaController class because coffeeshop-barista is exposing an endpoint for /orders to receive any order through REST. However, since you've implemented KafkaListener and you don't call it from coffeeshop-service, you can delete the BaristaController.java class file as it becomes redundant.
3. Verify the services are scalable and resilient
In a new terminal window, run the following command to add a Redpanda topic called orders with five partitions:
podman exec -it redpanda rpk topic create --partitions=5 orders
You should see the following message if the topic is successfully created:
TOPIC   STATUS
orders  OK
In each of the terminal windows you left open for the applications, run the following command:
./mvnw spring-boot:run
Run the batch order script again to see how the new system works:
./scripts/create_batch_orders.sh
The output should be as follows:
Order sent: Order{product='Espresso', name='Kaiser Soze', orderId='1'}
Order sent: Order{product='Americano', name='Mazer Rackham', orderId='2'}
Order sent: Order{product='Caffe Latte', name='Isaac Asimov', orderId='3'}
Order sent: Order{product='Espresso', name='Takeshi Kovacs', orderId='4'}
Order sent: Order{product='Americano', name='Aykut Bulgu', orderId='5'}
Order sent: Order{product='Caffe Latte', name='Franz Kafka', orderId='6'}
Order sent: Order{product='Caffe Latte', name='Kaiser Soze', orderId='7'}
Order sent: Order{product='Espresso', name='Mazer Rackham', orderId='8'}
Order sent: Order{product='Americano', name='Isaac Asimov', orderId='9'}
Order sent: Order{product='Filter Coffee', name='Takeshi Kovacs', orderId='10'}
Order sent: Order{product='Caffe Latte', name='Aykut Bulgu', orderId='11'}
Order sent: Order{product='Filter Coffee', name='Franz Kafka', orderId='12'}
Order sent: Order{product='Espresso', name='Kaiser Soze', orderId='13'}
Order sent: Order{product='Americano', name='Mazer Rackham', orderId='14'}
Order sent: Order{product='Caffe Latte', name='Isaac Asimov', orderId='15'}
Order sent: Order{product='Espresso', name='Takeshi Kovacs', orderId='16'}
Order sent: Order{product='Americano', name='Aykut Bulgu', orderId='17'}
Order sent: Order{product='Caffe Latte', name='Franz Kafka', orderId='18'}
Order sent: Order{product='Caffe Latte', name='Kaiser Soze', orderId='19'}
Order sent: Order{product='Espresso', name='Mazer Rackham', orderId='20'}
Order sent: Order{product='Americano', name='Isaac Asimov', orderId='21'}
Order sent: Order{product='Filter Coffee', name='Takeshi Kovacs', orderId='22'}
Order sent: Order{product='Caffe Latte', name='Aykut Bulgu', orderId='23'}
Order sent: Order{product='Filter Coffee', name='Franz Kafka', orderId='24'}
You can see that all orders are sent to Redpanda without any timeout.
In the terminal logs for coffeeshop-barista, you can see that the orders are processed:
... output omitted ...
2023-10-24T02:31:25.685+03:00  INFO 19527 --- [ntainer#0-0-C-1] c.systemcraftsman.demo.BaristaService    : Beverage{beverage='Americano', customer='Aykut Bulgu', preparedBy='Leo', orderId='17', preparationState=READY}
2023-10-24T02:31:29.690+03:00  INFO 19527 --- [ntainer#0-0-C-1] c.systemcraftsman.demo.BaristaService    : Beverage{beverage='Caffe Latte', customer='Franz Kafka', preparedBy='Leo', orderId='18', preparationState=READY}
2023-10-24T02:31:31.691+03:00  INFO 19527 --- [ntainer#0-0-C-1] c.systemcraftsman.demo.BaristaService    : Beverage{beverage='Caffe Latte', customer='Kaiser Soze', preparedBy='Leo', orderId='19', preparationState=READY}
2023-10-24T02:31:31.691+03:00  INFO 19527 --- [ntainer#0-0-C-1] c.systemcraftsman.demo.BaristaService    : Beverage{beverage='Espresso', customer='Mazer Rackham', preparedBy='Leo', orderId='20', preparationState=READY}
2023-10-24T02:31:34.692+03:00  INFO 19527 --- [ntainer#0-0-C-1] c.systemcraftsman.demo.BaristaService    : Beverage{beverage='Americano', customer='Isaac Asimov', preparedBy='Leo', orderId='21', preparationState=READY}
2023-10-24T02:31:38.695+03:00  INFO 19527 --- [ntainer#0-0-C-1] c.systemcraftsman.demo.BaristaService    : Beverage{beverage='Filter Coffee', customer='Takeshi Kovacs', preparedBy='Leo', orderId='22', preparationState=READY}
2023-10-24T02:31:40.700+03:00  INFO 19527 --- [ntainer#0-0-C-1] c.systemcraftsman.demo.BaristaService    : Beverage{beverage='Caffe Latte', customer='Aykut Bulgu', preparedBy='Leo', orderId='23', preparationState=READY}
2023-10-24T02:31:41.702+03:00  INFO 19527 --- [ntainer#0-0-C-1] c.systemcraftsman.demo.BaristaService    : Beverage{beverage='Filter Coffee', customer='Franz Kafka', preparedBy='Leo', orderId='24', preparationState=READY}
You can see that the barista robot's name is Leo in this case. You can also try adding another barista to see what happens.
Open another terminal window, navigate to the coffeeshop-barista application folder again, and run the ./mvnw clean spring-boot:run -Dspring-boot.run.arguments=--server.port=8082 command. This is a new instance of the barista service, so it acts like a new robot barista with a different name.
Note that the new instance uses port 8082.
Run the command ./scripts/create_batch_orders.sh again to see how the baristas share the order load.
The first coffeeshop-barista logs are as follows:
... output omitted ...
erage='Caffe Latte', customer='Franz Kafka', preparedBy='Leo', orderId='18', preparationState=READY}
2023-10-24T02:57:21.051+03:00  INFO 25292 --- [ntainer#0-0-C-1] c.systemcraftsman.demo.BaristaService    : Beverage{beverage='Espresso', customer='Mazer Rackham', preparedBy='Leo', orderId='20', preparationState=READY}
2023-10-24T02:57:24.052+03:00  INFO 25292 --- [ntainer#0-0-C-1] c.systemcraftsman.demo.BaristaService    : Beverage{beverage='Filter Coffee', customer='Takeshi Kovacs', preparedBy='Leo', orderId='22', preparationState=READY}
2023-10-24T02:57:26.056+03:00  INFO 25292 --- [ntainer#0-0-C-1] c.systemcraftsman.demo.BaristaService    : Beverage{beverage='Caffe Latte', customer='Aykut Bulgu', preparedBy='Leo', orderId='23', preparationState=READY}
The second coffeeshop-barista logs are as follows:
... output omitted ...
2023-10-24T02:57:06.025+03:00  INFO 25333 --- [ntainer#0-0-C-1] c.systemcraftsman.demo.BaristaService    : Beverage{beverage='Espresso', customer='Kaiser Soze', preparedBy='Mia', orderId='1', preparationState=READY}
2023-10-24T02:57:08.027+03:00  INFO 25333 --- [ntainer#0-0-C-1] c.systemcraftsman.demo.BaristaService    : Beverage{beverage='Caffe Latte', customer='Kaiser Soze', preparedBy='Mia', orderId='7', preparationState=READY}
2023-10-24T02:57:12.039+03:00  INFO 25333 --- [ntainer#0-0-C-1] c.systemcraftsman.demo.BaristaService    : Beverage{beverage='Caffe Latte', customer='Isaac Asimov', preparedBy='Mia', orderId='15', preparationState=READY}
2023-10-24T02:57:12.044+03:00  INFO 25333 --- [ntainer#0-0-C-1] c.systemcraftsman.demo.BaristaService    : Beverage{beverage='Americano', customer='Aykut Bulgu', preparedBy='Mia', orderId='17', preparationState=READY}
O 25333 --- [ntainer#0-0-C-1] c.systemcraftsman.demo.BaristaService    : Beverage{beverage='Americano', customer='Aykut Bulgu', preparedBy='Mia', orderId='17', preparationState=READY}
As you can see, the barista robots Leo and Mia worked together to prepare the orders. This shows how EDA enables microservices to scale.
Regarding resilience, you already verified that coffeeshop-service had no timeout errors or similar. But what happens if all the barista robots rest at the same time?
In both coffeeshop-barista terminal windows, press Ctrl+C or Command+C on your keyboard and stop their order consumption. Run the batch order creator script again and observe the output, which is similar to the following:
Order sent: Order{product='Americano', name='Isaac Asimov', orderId='21'}
Order sent: Order{product='Filter Coffee', name='Takeshi Kovacs', orderId='22'}
Order sent: Order{product='Caffe Latte', name='Aykut Bulgu', orderId='23'}
Order sent: Order{product='Filter Coffee', name='Franz Kafka', orderId='24'}
The customers created the orders, but no barista robot prepared the beverages. Nevertheless, there are no exceptions on the coffeeshop-service end. This ensures that the coffee shop system is resilient, as requested.
Finally, you can run one of the coffeeshop-barista instances and verify the orders are processed successfully.
Conclusion
Congratulations! You learned about the challenges associated with microservices, the limitations of request-driven architectures, and the advantages of event-driven architecture—particularly in the context of microservices. You also learned how to use Redpanda to implement an event-driven system by refactoring a request-driven Spring Boot microservices system to make it more resilient, scalable, and fault-tolerant.
Remember, you can find the full code for the tutorial in this GitHub repository. If you have questions, join the Redpanda Community on Slack and ask away.
To keep exploring Redpanda, check the documentation and browse the Redpanda blog for tutorials.

Let's keep in touch
Subscribe and never miss another blog post, announcement, or community event. We hate spam and will never sell your contact information.


