Build a clickstream processor with a faster, simpler Kafka-compatible schema registry
Welcome to the second post in our schema registry series. The first post explained the basics of schema registry in Apache Kafka®, including how data serialization and deserialization work in the scope of Kafka client APIs, and a brief introduction to Redpanda schema registry.
To give you a quick refresher: we covered how Kafka doesn’t have its own schema registry built-in, so you rely on third-party components to store your data schemas in one central repository. We also highlighted how this can become complex to manage as your event-driven architecture scales and your data schemas evolve.
With Redpanda, the schema registry is already built-in so you can store, version control, and validate schemas for your real-time applications without deploying or managing anything other than the Redpanda cluster.
In this post, we’ll show you how to leverage Redpanda’s Kafka-compatible schema registry in your real-time applications. With a simple clickstream processing use case as an example, we’ll walk you through a Python producer and a consumer that uses the Redpanda schema registry for producing and consuming Apache Avro™ messages with Redpanda. We chose Avro since it’s the most popular choice to serialize data in a compact binary format and support schema evolution.
Let’s get started!
How to build a clickstream processing application
It’s time to get down to the code. In just five steps, we’ll spin up a single-node Redpanda cluster in Redpanda Console with Docker Compose, and then use a schema-registry-aware SDK client (confluent-kafka) to produce and consume Avro messages to Redpanda. The SDK will do most of the heavy lifting, including schema registration, and schema compatibility checking.
In brief, the Python producer application collects user interaction events from a web application, serializes them in Avro, and publishes them into the clickstream topic in Redpanda. Another Python application consumes them from Redpanda, deserializes, and uses them to analyze user behavior.

The format of a sample ClickStream event would look like this:
{
   "user_id":2323,
   "event_type":"BUTTON_CLICK",
   "ts":"2018-11-12 01:02:03.123456789"
}
To mimic the above use case, we’ll write a simple producer and consumer in Python that produce and consume messages from the clickstream Redpanda topic. They’ll use the PandaProxy REST API to communicate with the schema registry.
Before we start, make sure you have Docker Desktop and Python 3 (with pip) installed on your local machine.
1. Clone the GitHub repository
This GitHub repository contains a few artifacts to bootstrap the tutorial. It will help you get started immediately. We will create additional code artifacts as we progress through the tutorial.
Execute the following commands to clone the repository to your local machine.
git clone https://github.com/redpanda-data-blog/2023-schema-registry-kafka-avro-tutorial.git code
cd code
2. Install Python dependencies
We will install several Python libraries used by the Python clients you will see later in this tutorial. You will find them in the requirements.txt file at the root level of the repo. To prevent them from clashing with your local dependencies, let’s create a new virtual environment for them with venv.
Execute the following commands in a terminal window.
python3 -m venv env
source env/bin/activate
pip install --upgrade pip
pip install -r requirements.txt
Also, note that we’re using the confluent-kafka Python SDK for all the API communications with the Redpanda schema registry. It’s a schema-registry-aware SDK that’s also compatible with the Confluent schema registry. Because of that, confluent-kafka will do a lot of heavy lifting for us under the hood, such as adding padding for each message consisting of the magic byte and the schemaID. Also, it can automatically register the schemas with the registry.
Another advantage is that you use the Redpanda schema registry with your Confluent SDK clients, without needing any code changes.
3. Start a Redpanda cluster
Next, we will use Docker Compose to create a Redpanda cluster.
Locate the docker-compose.yml file at the root level of the cloned repository and run the following command in a terminal.
docker compose up -dThat will spin up a single-node Redpanda cluster with the Redpanda console. This Redpanda node contains the schema registry built-in. You can visually explore the schema definitions stored in the schema registry with the Redpanda console.
Access the console by logging into http://localhost:8080/brokers. Click on the Schema Registry in the sidebar to see the schema definitions.
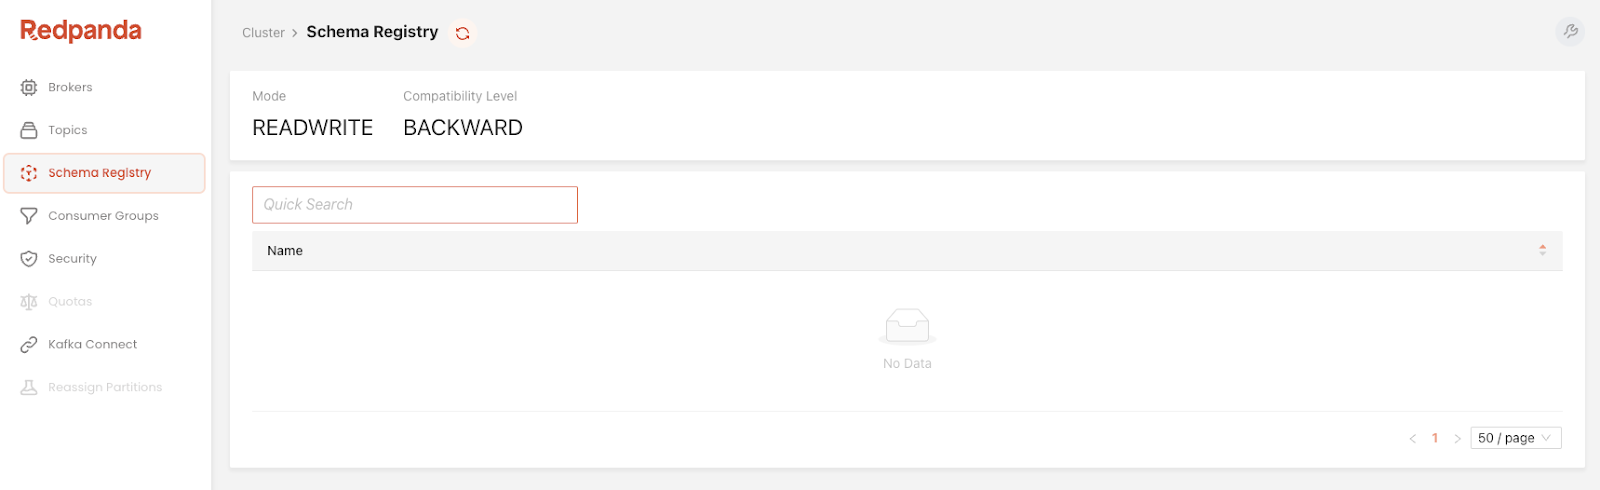
You should see an empty screen since we started the cluster from scratch.
4. Write the producer code
Now that we have a functioning Redpanda cluster, the next step is to produce Avro-formatted messages.
The producer.py in the cloned repository has the Python code for event production. Its content would look like this:
import json
from uuid import uuid4
from confluent_kafka import KafkaException
from confluent_kafka.avro import AvroProducer
from confluent_kafka import avro

def delivery_callback(error, message):
    if error:
        print("Failed to send the message: %s" % error)
    else:
        print(f"Message with the key {message.key()} has been produced to the topic {message.topic()}")

def load_avro_schema_from_file():
    key_schema_string = """
    {"type": "string"}
    """

    key_schema = avro.loads(key_schema_string)
    value_schema = avro.load('./schemas/click_event.avsc')

    return key_schema, value_schema

def produce():
    config = {
        'bootstrap.servers' : "localhost:9092",
        'schema.registry.url' : "http://localhost:8081"
    }

    key_schema, value_schema = load_avro_schema_from_file()

    producer = AvroProducer(
        config,
        default_key_schema = key_schema,
        default_value_schema = value_schema
    )

    try:
        key = str(uuid4())
        value_str = '{"user_id":2,"event_type":"CLICK","ts":"2021-12-12"}'
        value = json.loads(value_str)

        producer.produce(
            topic = "clickstream",
            key = key,
            value = value,
            on_delivery = delivery_callback
        )

        producer.poll(10000)
        producer.flush()

    except KafkaException as e:
        print("Error occurred during message production:", e)

    print("Done!")

def main():
    produce()

if __name__ == "__main__":
    main()
Most of the methods are just the boilerplate code and are self-explanatory. So, let’s walk through the methods that matter most to serialization.
First, we pass the schema URL to the SDK client by setting the configuration property, schema.registry.url.
Next, the load_avro_schema_from_file() method returns two schemas for a ClickStream event—the schema for the key and the schema for the value.
def load_avro_schema_from_file():
    key_schema_string = """
    {"type": "string"}
    """

    key_schema = avro.loads(key_schema_string)
    value_schema = avro.load('./schemas/click_event.avsc')

    return key_schema, value_schema
Note that the value schema is loaded from the schemas/click_event.avsc file in the repository. That file contains the following Avro schema definition which defines the structure of a ClickStream event.
{
    "type" : "record",
    "namespace" : "com.redpanda.examples.avro",
    "name" : "ClickEvent",
    "fields" : [
       { "name": "user_id", "type" : "int" },
       { "name": "event_type", "type" : "string" },
       { "name": "ts", "type": "string" }
    ]
 }
Once both schemas are derived, they are passed as the arguments to the SDK’s serializer (AvroProducer). If you recall the serialization workflow above, this is where the AvroProducer requested the schemaID for the subject, ClickEvent. Here, the subject name is derived from the name field, specified in the Avro schema definition.
producer = AvroProducer(
        config,
        default_key_schema = key_schema,
        default_value_schema = value_schema
    )
When the producer code runs for the first time, the AvroProducer automatically registers the ClickEvent schema in the schema registry and fetches the schemaID, which happens to be 1. This schema ID is unique across the Redpanda cluster, and you can use it to retrieve the schema later.
The subsequent invocations will read the schemaID from the cache.
Next, run the file on a terminal to produce Avro messages.
python producer.pyLog into the Redpanda Console’s Topics page to see if the clickstream topic has been populated with a single event.
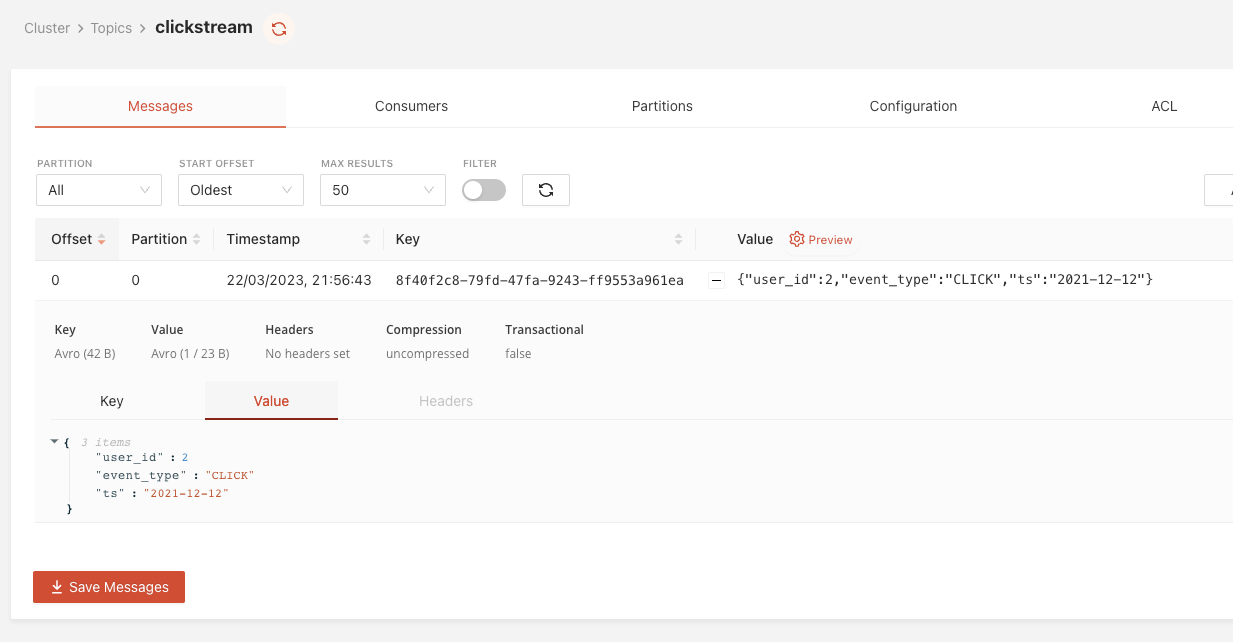
Note that the Redpanda Console can deserialize Avro messages for you, showing you the content of the clickstream event’s payload (value) since we used a schema registry-aware Python SDK. As both the producer client and the Console use the same schema registry, the Console can determine which schema to use for deserialization by looking at the schemaID portion carrying in each message.
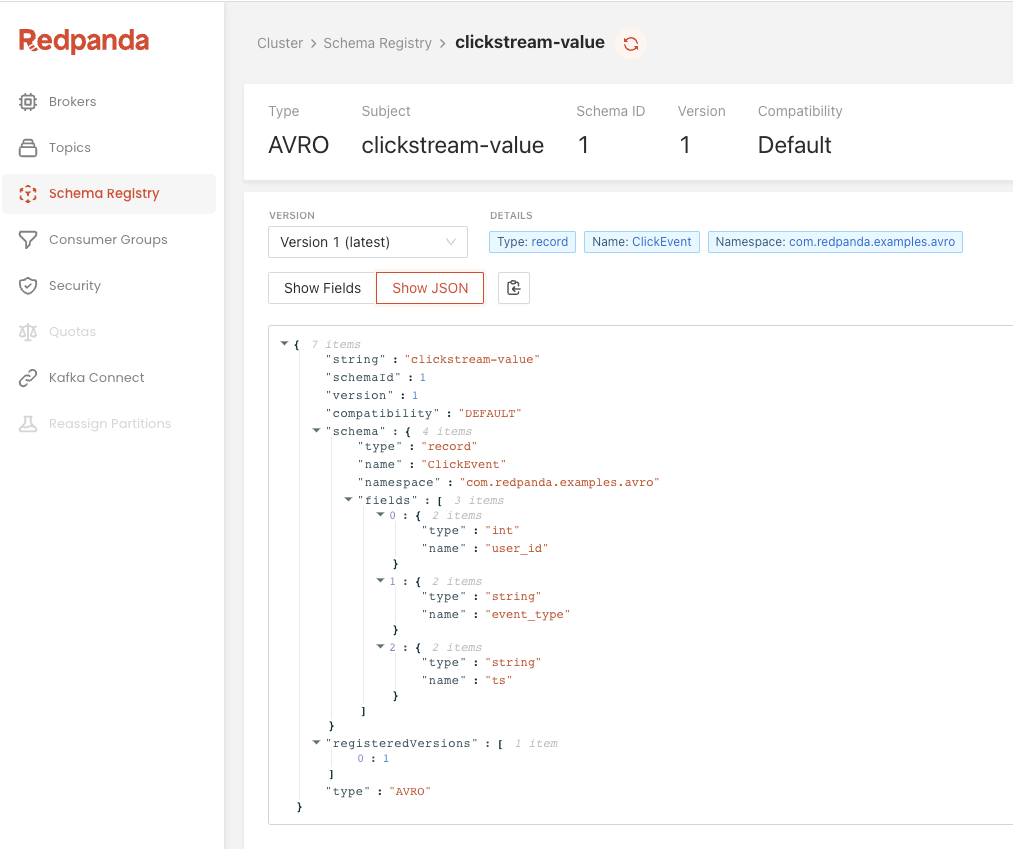
Next, log in to the Redpanda console’s Schema Registry page to verify the schema registration. You will see the clickstream-key and the clickstream-value schema definitions have already been registered with the schema registry.
5. Write the consumer code
Now that we have Avro-formatted messages in the clickstream topic. Let’s deserialize them with a Python consumer.
The consumer.py file in the repository contains the code to consume the clickstream topic, deserialize the messages, and print their content on the terminal. The file content would look like this:
import json
from confluent_kafka import KafkaException
from confluent_kafka.avro import AvroConsumer
from confluent_kafka import avro

def consume():
    config = {
        "bootstrap.servers": "localhost:9092",
        "schema.registry.url": "http://localhost:8081",
        "group.id": "my-connsumer1",
        "auto.offset.reset": "earliest"
    }

    consumer = AvroConsumer(config)
    consumer.subscribe(["clickstream"])

    while True:
      try:
        msg = consumer.poll(1)

        if msg is None:
          continue

        print("Key is :" + json.dumps(msg.key()))
        print("Value is :" + json.dumps(msg.value()))
        print("-------------------------")

      except KafkaException as e:
        print('Kafka failure ' + e)

    consumer.close()

def main():
    consume()

if __name__ == '__main__':
    main()
The code is pretty self-explanatory. As we did with the producer, the schema registry URL has been configured with config object and passed into the Avro deserializer, AvroConsumer, which subscribes to the clickstream topic.
That’s all you need to know. The rest, including the schemaID discovery, schema retrieval, and finally, the deserialization will be taken care of by the AvroConsumer.
Run the file in a terminal.
python consumer.pyYou should see a single event in return, with their deserialized content as follows.
Key is :"39950858-1cfd-4d56-a3ac-2bde1c806f6f"
Value is :{"user_id": 2, "event_type": "CLICK", "ts": "2021-12-12"}
Conclusion
If you made it this far, give yourself a pat on the back because you just used Redpanda’s built-in schema registry to produce and consume Avro messages! Feel free to customize this example further and play around with other data schema formats, like Protobuf.
To learn more about Redpanda, check out our documentation and browse the Redpanda blog for more tutorials on how to use Redpanda. If you prefer to be more hands-on, take Redpanda's free Community edition for a spin!
If you get stuck, have a question, or just want to chat with our team and fellow Redpanda users, join our Redpanda Community on Slack.

Let's keep in touch
Subscribe and never miss another blog post, announcement, or community event. We hate spam and will never sell your contact information.


