Learn how to set up a delivery system for webhooks to build scalable, real-time applications

As the Internet continues to process more and more data, the systems and web apps we build need to adapt to handle larger-scale workloads. One of the most effective ways to do this is by leveraging webhooks, also known as user-defined callbacks, which enable real-time communication between two systems connected over the Internet.
In this tutorial, we'll show you how to build a delivery system for webhooks using Redpanda. This will enable you to build real-time, fault-tolerant applications that can seamlessly communicate with other services.
Now, let’s cover a few basics before diving into the tutorial.
What’s a webhook dispatcher?
A webhook dispatcher is a system responsible for delivering webhooks to external clients. A webhook dispatcher handles all aspects of a webhook, from the acknowledgment of the event to the eventual sending and error-handling scenarios of webhooks in the system.
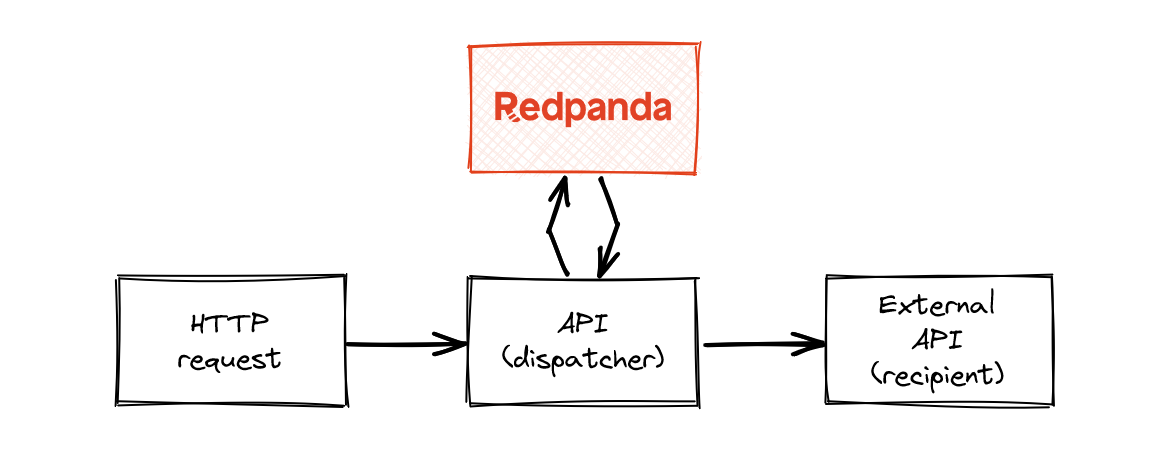
A webhook is a mechanism for real-time communication between different APIs (mostly HTTP requests). Unlike traditional API polling methods that continuously request updates, such as long polling, webhooks provide a more efficient approach, immediately responding via an API call. Most implementations of webhooks are built on top of a data streaming platform, such as Apache Kafka® or Redpanda.
Many webhooks are triggered by specific events, such as a help desk that needs to respond to clients when their customer queries have been processed.
How to build a webhook dispatcher
In brief, we’ll create an HTTP endpoint that clients can hit with their own specific events to queue up webhooks to send to an external client. This could be your own app or any other third-party app.
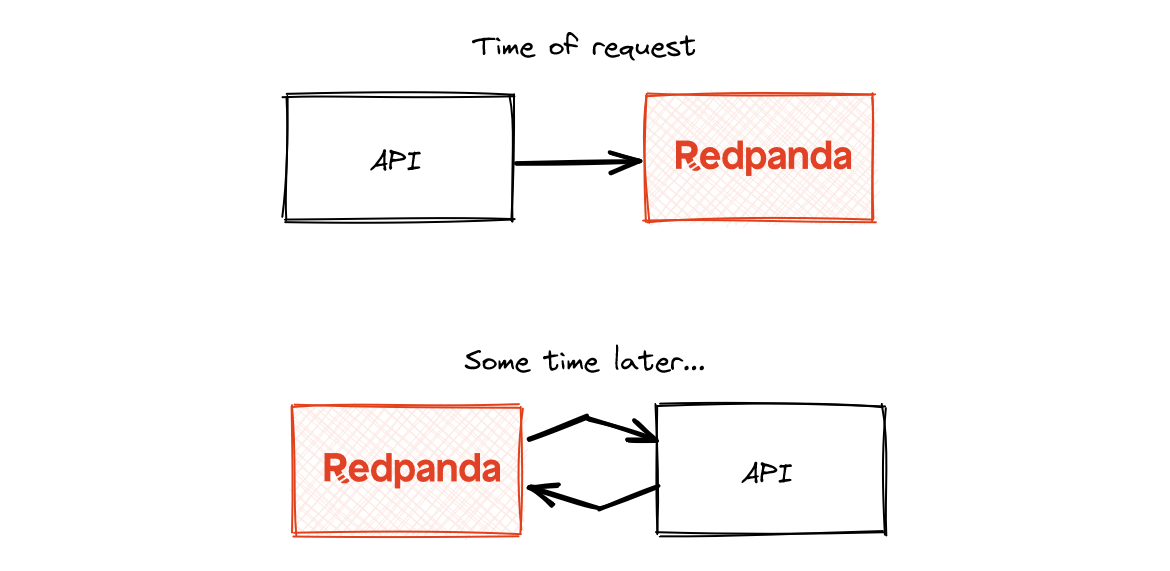
Although processing each request within a thread on your server can be risky—when an HTTP request fails, context is lost, ultimately leading to the loss of information. Redpanda solves this by persisting each event. Each event will then be picked up for processing by your API. If the processing of an event fails, it can be retried at a later time.
We’ll set you up with some Docker containers for both an internal and external API, and build the webhook dispatcher to call the external API.
That said, let’s dive into the code. To get you rolling, you can find everything in this GitHub repo.
Prerequisites
First, you’ll need to set up the following in your development environment:
Step 1: Scoping your webhook dispatcher
Here’s what we’ll need to code for this application.
Two separate APIs, internal and external, so that we can test our webhook dispatcher. We’ll expose the dispatcher via the internal API.
Set up Redpanda to facilitate the messaging.
Develop the API endpoint on the internal API, which ultimately will lead to a webhook at a later time. At this point, we’ll fire an event to a Redpanda topic.
Set up our consumer, which will consume the event and automatically send off the webhook.
Below is what our API contract for the dispatcher will look like. We’ll accept an eventType, a webhookUrl (the unique URL to which the webhook should be sent), and payload, the payload of the webhook to be sent.
POST /webhook

Request Body (JSON Payload):
{
  "id": uuid,
  "eventType": string,
  "webhookUrl": string,
  "payload": object,
}
Step 2: Set up the APIs
Let’s start by setting up the two APIs. For this tutorial, we’ll be using AdonisJS, which is a framework for rapid TypeScript development. To set up the two different APIs, run the following commands via NPM in a folder of your choice, using all of the defaults:
npm init adonis-ts-app@4.2.4 api
npm init adonis-ts-app@4.2.4 external
You should now have two folders—one for each project. In each folder, also add the following to a Dockerfile
ARG NODE_IMAGE=node:16.13.1-alpine

FROM $NODE_IMAGE AS base
RUN apk --no-cache add dumb-init
RUN mkdir -p /home/node/app && chown node:node /home/node/app
WORKDIR /home/node/app
USER node
RUN mkdir tmp

FROM base AS dependencies
COPY --chown=node:node ./package*.json ./
RUN npm ci
COPY --chown=node:node . .

FROM dependencies AS build
RUN node ace build --production

FROM base AS production
ENV NODE_ENV=production
ENV PORT=$PORT
ENV HOST=0.0.0.0
COPY --chown=node:node ./package*.json ./
RUN npm ci --production
COPY --chown=node:node --from=build /home/node/app/build .
EXPOSE $PORT
CMD [ "dumb-init", "node", "server.js" ]
Create your docker-compose.yml file in the root, which will orchestrate things for your local development.
version: '3.8'

services:
  adonis_app:
    container_name: adonis_app
    restart: always
    build:
      context: api/
      target: dependencies
    ports:
      - "3333:3333"
      - "9229:9229"
    env_file:
      - api/.env
    volumes:
      - ./api/:/home/node/app
      # Uncomment the below line if you developing on MacOS
      #- /home/node/app/node_modules
    command: dumb-init node ace serve --watch --node-args="--inspect=0.0.0.0"
    networks:
      - http_network

  external_api:
    container_name: external_api
    restart: always
    build:
      context: external/
      target: dependencies
    env_file:
      - external/.env
    volumes:
      - ./external/:/home/node/app
      # Uncomment the below line if you developing on MacOS
      #- /home/node/app/node_modules
    command: dumb-init node ace serve --watch --node-args="--inspect=0.0.0.0"
    networks:
      - http_network
networks:
  http_network:
    driver: bridge
Now that this is all up and running, you should be able to run docker compose up from your command line, and you’ll see something similar to this:
Attaching to adonis_app, external_api
external_api  | [ info ]  building project...
external_api  | [ info ]  starting http server...
external_api  | Debugger listening on ws://0.0.0.0:9229/c1354c53-8e18-4944-9443-cd2eaff8f3ad
adonis_app    | [ info ]  building project...
adonis_app    | [ info ]  starting http server...
adonis_app    | Debugger listening on ws://0.0.0.0:9229/8eedd05c-e7e4-4b8f-b4f3-1e505c611bbf
external_api  | [ info ]  watching file system for changes
adonis_app    | [ info ]  watching file system for changes
external_api  | [21:50:16.404] INFO (external/18): started server on 0.0.0.0:3333
external_api  | ╭─────────────────────────────────────────────────╮
external_api  | │                                                 │
external_api  | │    Server address: 127.0.0.1:3333               │
external_api  | │    Watching filesystem for changes: YES         │
external_api  | │                                                 │
external_api  | ╰─────────────────────────────────────────────────╯
adonis_app    | [21:50:16.479] INFO (api/19): started server on 0.0.0.0:3333
adonis_app    | ╭─────────────────────────────────────────────────╮
adonis_app    | │                                                 │
adonis_app    | │    Server address: 127.0.0.1:3333               │
adonis_app    | │    Watching filesystem for changes: YES         │
adonis_app    | │                                                 │
adonis_app    | ╰─────────────────────────────────────────────────╯
Step 3: Set up Redpanda
Setting up Redpanda in Docker Compose is simple. To allow our API to connect to Redpanda, add the following lines to the API in the Docker Compose file:
adonis_app:
    container_name: adonis_app
..<OTHER CODE>..
     networks:
       - http_network
       - redpanda_network
     depends_on:
       - redpanda
Now you need to actually define your Docker services.
redpanda:
    image: docker.redpanda.com/redpandadata/redpanda:v23.1.1
    command:
      - redpanda start
      - --smp 1
      - --overprovisioned
      - --kafka-addr PLAINTEXT://0.0.0.0:29092,OUTSIDE://0.0.0.0:9092
      - --advertise-kafka-addr PLAINTEXT://redpanda:29092,OUTSIDE://redpanda:9092
      - --pandaproxy-addr 0.0.0.0:8082
      - --advertise-pandaproxy-addr localhost:8082
    ports:
      - 8081:8081
      - 8082:8082
      - 9092:9092
      - 9644:9644
      - 29092:29092
    volumes:
      - redpanda:/var/lib/redpanda/data
    networks:
      - redpanda_network

  console:
    image: docker.redpanda.com/redpandadata/console:v2.2.2
    entrypoint: /bin/sh
    command: -c "echo \"$$CONSOLE_CONFIG_FILE\" > /tmp/config.yml; /app/console"
    environment:
      CONFIG_FILEPATH: /tmp/config.yml
      CONSOLE_CONFIG_FILE: |
        kafka:
          brokers: ["redpanda:29092"]
          schemaRegistry:
            enabled: true
            urls: ["http://redpanda:8081"]
        redpanda:
          adminApi:
            enabled: true
            urls: ["http://redpanda:9644"]
        connect:
          enabled: true
          clusters:
            - name: local-connect-cluster
              url: http://connect:8083
    ports:
      - 8080:8080
    networks:
      - redpanda_network
    depends_on:
      - redpanda

networks:
  http_network:
    driver: bridge
  redpanda_network:
    driver: bridge
volumes:
  redpanda: null
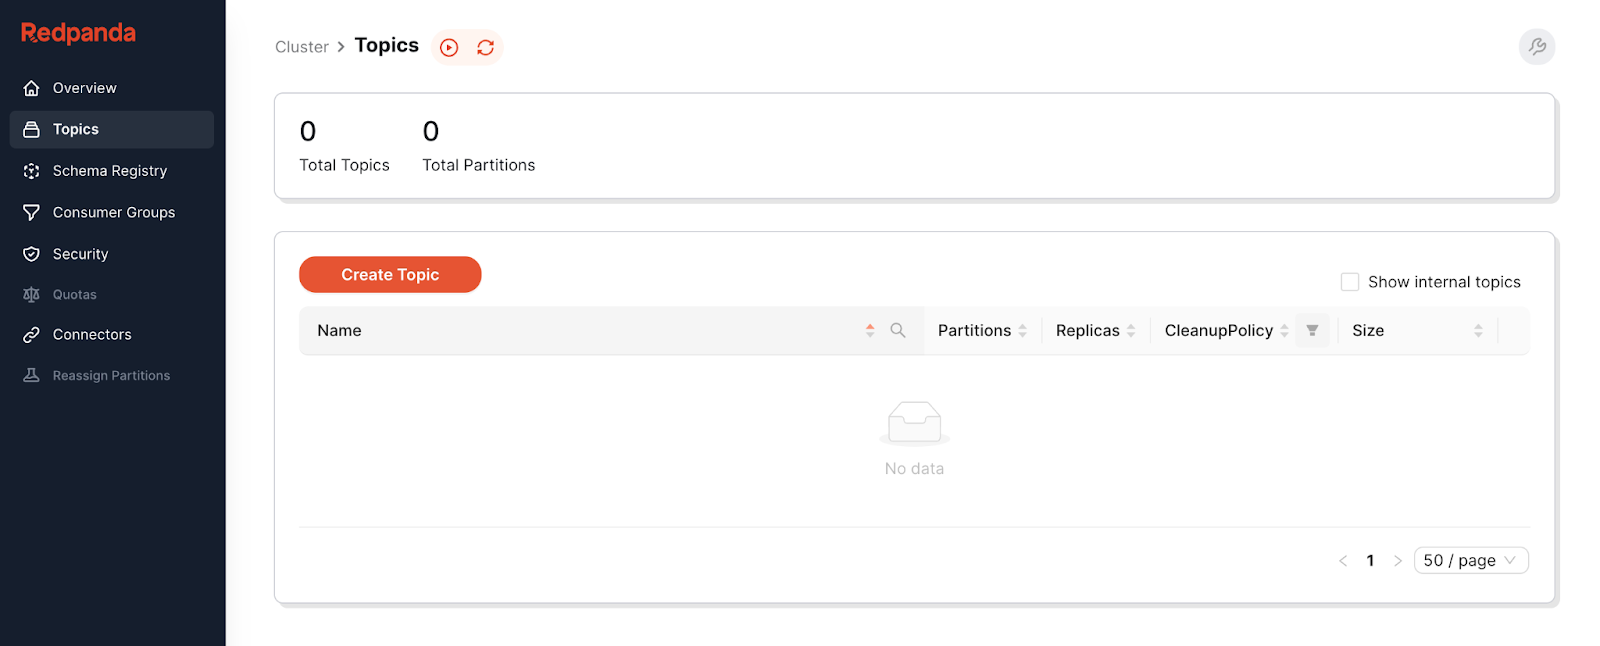
You should now be able to run docker compose up —and if you travel to localhost:8080 in your browser, you’ll see the Redpanda Console—a Kafka web UI where you see and manage all your topics.
Connecting Redpanda to the API is also straightforward. Navigate to your api folder and run npm install kafkajs to install the client.
Then, add an environment variable in the .env and env.ts files.
REDPANDA=redpanda:9092REDPANDA: Env.schema.string(),Step 4: Internal API - Creating a topic
Now that we have our infrastructure set up, let’s get into the weeds of the implementation. There are a few components to consider as a part of the webhook dispatcher:
The trigger signals that an event occurs and a webhook should be sent soon. In our case, we’ll be using HTTP Requests for this.
The persistence of the event to Redpanda for sending at a later time (most of the time - immediately).
The consuming of the event from Redpanda, and the sending of the webhooks to the external client.
With all of this established, let’s implement the API. In AdonisJS, routes are defined in start/routes.ts
You’ll be mapping an eventType to a topic, so you can scale capacity for each eventType independently if needed. The logic will look like this:
Dynamically create the topic if it doesn’t exist for that
eventType.Write the event to the topic.
Return status code
200to the caller.
Start with defining your interface in api/contracts/interfaces/redpanda.interface.ts
export default interface RedpandaInterface {
  getOrCreateTopic(eventType: string): Promise<string>
}
Then, your service to interact with Redpanda in api/app/services/redpanda.service.ts
import { Admin } from 'kafkajs'

export default class RedpandaService {
 constructor(private readonly admin: Admin) {}

 public async getOrCreateTopic(eventType: string) {
   const existingTopics = await this.admin.listTopics()
   if (existingTopics.includes(eventType)) {
     return existingTopics[existingTopics.indexOf(eventType)]
   }

   await this.admin.createTopics({
     topics: [
       {
         topic: eventType,
         numPartitions: 1,
         replicationFactor: 1,
       },
     ],
   })

   return eventType
 }
}
You’ll need to wire this up with AdonisJS by declaring a module in app/contracts/redpanda.ts and registering it in the AppProvider.ts file:
declare module '@ioc:RedpandaService' {
  import RedpandaInterface from 'Contracts/interfaces/redpanda.interface'

  const RedpandaService: RedpandaInterface
  export default RedpandaService
}
import RedpandaService from 'App/services/redpanda.service'
export default class AppProvider {
constructor(protected app: ApplicationContract) {}
public register() {
const redpanda = new Kafka({
brokers: [Env.get('REDPANDA')],
})
this.app.container.singleton(
'RedpandaService',
() => new RedpandaService(redpanda.admin())
)
}
...
}Finally, wire up the endpoint to actually get or create the topic in routes.ts
import Route from '@ioc:Adonis/Core/Route'
import RedpandaService from '@ioc:RedpandaService'

Route.post('/webhook', async ({ request }) => {
  const { eventType } = request.body()

  await RedpandaService.getOrCreateTopic(eventType)

  // TODO: Write payload to topic

  return { success: true }
})
To test this, make sure your containers are up and running, and make a cURL request to your API.
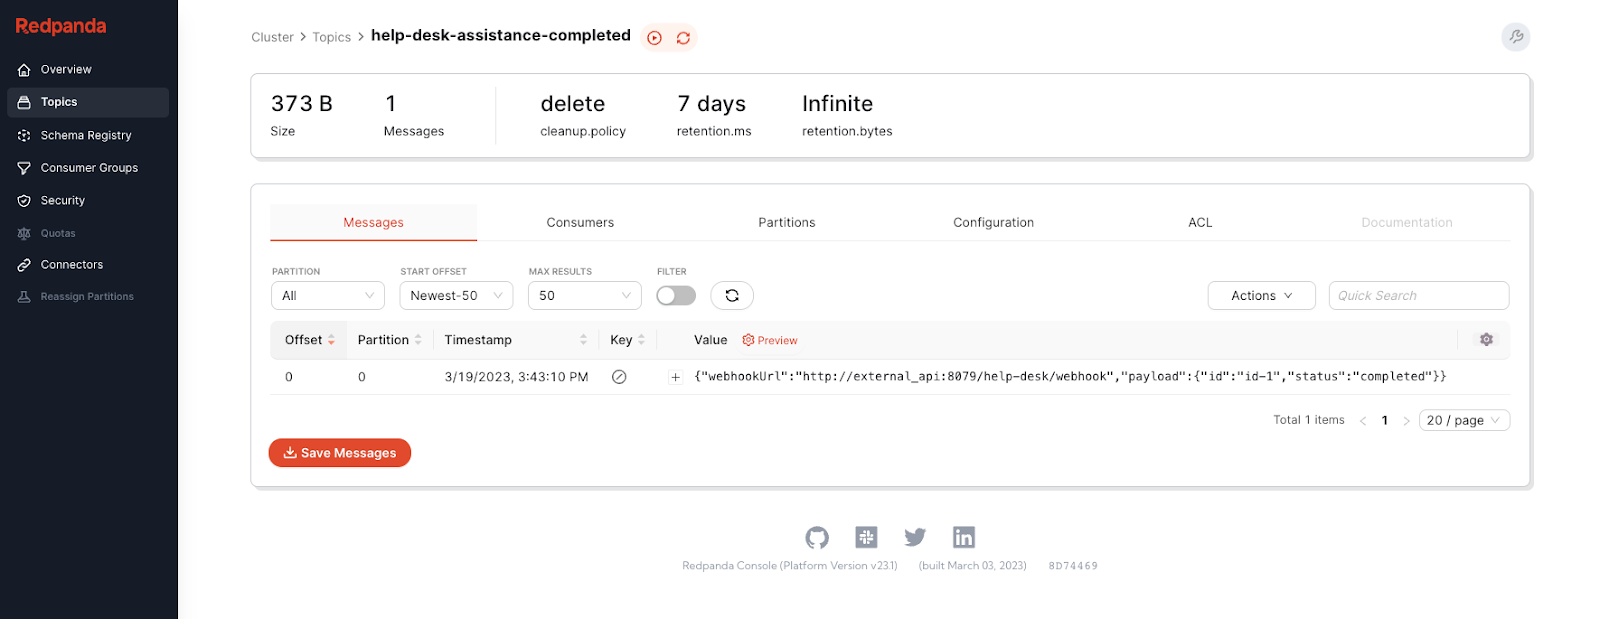
curl -X POST -H "Content-Type: application/json" -d '{"eventType": "help-desk-assistance-completed"}' http://localhost:3333/webhookYou should see { “success”: true } in your console, and if you check the Redpanda Console, you’ll see a topic of help-desk-assistance-completed was created.
Step 5: Queue the event
Next up is sending the payload to the topic you just created. You’ll need a new function to publish the event, then add some parameters to the Redpanda Service file to access the producer.
app/contracts/interfaces/redpanda.interface.ts
export default interface RedpandaInterface {
  getOrCreateTopic(eventType: string): Promise<string>
  createEvent(topicName: string, webhookUrl: string, payload: object): Promise<void>
}
app/services/redpanda.service.ts
import { Admin, Producer } from 'kafkajs'

export default class RedpandaService {
  constructor(private readonly admin: Admin, private readonly producer: Producer) {
   this.producer.connect()
  }

  public async getOrCreateTopic(eventType: string) {...}

  public async createEvent(topicName: string, webhookUrl: string, payload: string) {
    const eventData = {
      webhookUrl,
      payload,
    }
    await this.producer.send({
      topic: topicName,
      messages: [{ value: JSON.stringify(eventData) }],
    })
  }
providers/AppProvider.ts
  public register() {
    const redpanda = new Kafka({
      brokers: [Env.get('REDPANDA')],
    })
    this.app.container.singleton(
      'RedpandaService',
      () => new RedpandaService(redpanda.admin(), redpanda.producer())
    )
  }
start/routes.ts
Route.post('/webhook', async ({ request }) => {
  const { eventType, webhookUrl, payload } = request.body()

  const topicName = await RedpandaService.getOrCreateTopic(eventType)
  await RedpandaService.createEvent(topicName, webhookUrl, payload)

  return { success: true }
})
Double-check that everything is working correctly with a cURL request before moving on.
curl -X POST -H "Content-Type: application/json" -d '{"eventType": "help-desk-assistance-completed", "webhookUrl": "http://external_api:3333/help-desk/webhook", "payload": { "id": "id-1", "status": "completed" }}' http://localhost:3333/webhookAlso, open up Redpanda Console and click on the help-desk-assistance-completed topic to see your event.
Step 6: Refactoring
You’ve been implementing and testing things along the way to make sure everything is working. While this is incredibly effective for diagnosing bugs as they pop up, let’s take a quick detour to do some refactoring. The creation of the topic isn’t really something the logic behind the endpoint needs to know about.
Let’s move the creation of the topic into redpanda.service.ts, behind the call to createEvent.
redpanda.service.ts
export default class RedpandaService {
  constructor(private readonly admin: Admin, private readonly producer: Producer) {
    this.producer.connect()
  }

  private async getOrCreateTopic(eventType: string) {...}

  public async createEvent(eventType: string, webhookUrl: string, payload: object) {
    const topicName = await this.getOrCreateTopic(eventType)
    const eventData = {
      webhookUrl,
      payload,
    }
    await this.producer.send({
      topic: topicName,
      messages: [{ value: JSON.stringify(eventData) }],
    })
  }
}
start/routes.ts
Route.post('/webhook', async ({ request }) => {
  const { eventType, webhookUrl, payload } = request.body()

  await RedpandaService.createEvent(eventType, webhookUrl, payload)

  return { success: true }
})
contracts/interfaces/redpanda.interface.ts
export default interface RedpandaInterface {
  createEvent(eventType: string, webhookUrl: string, payload: object): Promise<void>
}
Step 7: Consume the event from Redpanda
Next, we need to consume the event so it can be sent later on. You’ll need to create a consumer and then send off the webhook based on the webhook URL stored in the message. To start, create a new folder and file, app/consumers/redpanda.consumers.ts
In this file, you’ll need to do the following:
Set up a function,
initializeConsumersForExistingTopicsto bootstrap all consumers for existing topics when the API first boots up.Create a new consumer when a new topic is created at runtime. The name of this function will be
connectNewConsumer, and it’ll be a public function.
You’ll also need to store the alive consumers, so they don’t get garbage collected by NodeJS.
import { Consumer, Kafka } from 'kafkajs'

export default class RedpandaConsumers {
 private readonly aliveConsumers: Consumer[]

 constructor(private readonly redpanda: Kafka) {
   this.aliveConsumers = []
   this.initializeConsumersForExistingTopics()
 }

 public async connectNewConsumer(topicName: string) {
   const consumer = await this.initializeSingleConsumer(topicName)
   this.aliveConsumers.push(consumer)
 }

 private async initializeConsumersForExistingTopics() {
   const topics = await this.redpanda.admin().listTopics()

   topics
     .filter((topic) => !topic.startsWith('_'))
     .map(async (topic) => {
       const consumer = await this.initializeSingleConsumer(topic)
       this.aliveConsumers.push(consumer)
     })
 }

 private async initializeSingleConsumer(topic: string) {
   const consumer = this.redpanda.consumer({ groupId: `webhook-sending-group-${topic}` })
   await consumer.connect()
   await consumer.subscribe({ topic })
   await consumer.run({
     eachMessage: async ({ message }) => {
       const event = JSON.parse((message.value as Buffer).toString())
       console.log(event)
     },
   })
   return consumer
 }
}
This code alone doesn’t do much unless it’s called, so let’s wire it up to AdonisJS in the AppProvider.ts
  public register() {
    const redpanda = new Kafka({
      brokers: [Env.get('REDPANDA')],
    })
    const consumers = new RedpandaConsumers(redpanda)
    this.app.container.singleton('RedpandaConsumers', () => consumers)
    this.app.container.singleton(
      'RedpandaService',
      () => new RedpandaService(redpanda.admin(), redpanda.producer(), consumers)
    )
  }
Note that RedpandaConsumers passed to your RedpandaService. That’s so you can create a new consumer when a new topic is created at the time of a request.
export default class RedpandaService {
  constructor(
    private readonly admin: Admin,
    private readonly producer: Producer,
    private readonly redpandaConsumers: RedpandaConsumers
  ) {
    this.producer.connect()
  }

  private async getOrCreateTopic(eventType: string) {
    const existingTopics = await this.admin.listTopics()
    if (existingTopics.includes(eventType)) {
      return existingTopics[existingTopics.indexOf(eventType)]
    }

    await this.admin.createTopics({
      topics: [
        {
          topic: eventType,
          numPartitions: 1,
          replicationFactor: 1,
        },
      ],
    })
    await this.redpandaConsumers.connectNewConsumer(eventType)

    return eventType
  }

  public async createEvent(eventType: string, webhookUrl: string, payload: object) {...}

}
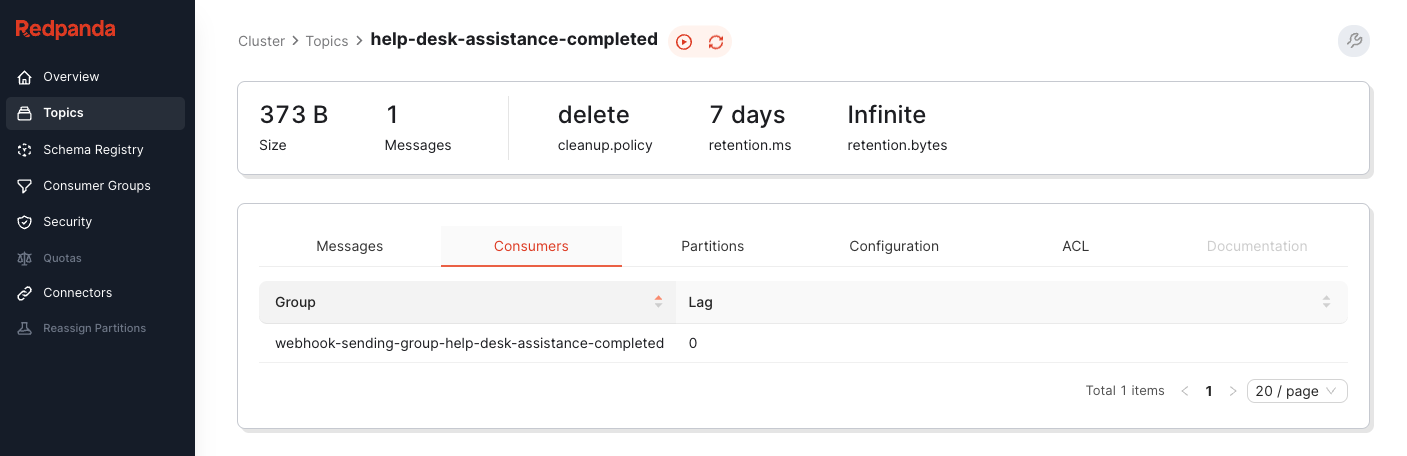
The Redpanda Console is again super helpful here—as we can see the consumer connected to our topic on the Consumers tab:
Step 8: Sending the Webhook
It’s time to send the webhook! Use Axios to make the call by running npm install axios from the API root directory.
You can now make a light modification to call the webhookUrl on each message you receive.
app/consumers/redpanda.consumers.ts
  private async initializeSingleConsumer(topic: string) {
    const consumer = this.redpanda.consumer({ groupId: `webhook-sending-group-${topic}` })
    await consumer.connect()
    await consumer.subscribe({ topic })
    await consumer.run({
      eachMessage: async ({ message }) => {
        const event = JSON.parse((message.value as Buffer).toString())

        const { webhookUrl, payload } = event

        await axios.post(webhookUrl, { ...payload })
      },
    })
    return consumer
  }
Before you test, you’ll need to actually create the HTTP endpoint on the external API so you have something to hit.
external/start/routes.ts
Route.post('/help-desk/webhook', async ({ request }) => {
  console.log(`Received webhook with body: ${JSON.stringify(request.body())}`)
  return { success: 'true' }
})
Now, give it a try one last time.
curl -X POST -H "Content-Type: application/json" -d '{"eventType": "help-desk-assistance-completed", "webhookUrl": "http://external_api:3333/help-desk/webhook", "payload": { "id": "id-1", "status": "completed" }}' http://localhost:3333/webhookIn your console, where you ran docker compose up, you should see the following:
external_api | Received webhook with body: {"id":"id-1","status":"completed"}Summary and next steps
Congratulations! You just built a webhook dispatcher with Redpanda so you can send webhooks from your API to any external API. You implemented an endpoint to receive the data to send in a webhook and also implemented a consumer and producer to serialize/deserialize data to and from a Redpanda Cluster on a local machine.
Want to dig a bit deeper? Here are some potential extensions to explore:
Failure cases - build a retry policy with exponential backoff.
Route your webhook request based on which machine they originated from.
Add idempotency logic to prevent duplicate webhook sending when an event occurs.
Our current implementation only supports POST requests - add support for incoming webhooks of other types, such as PUT, PATCH, and DELETE.
This implementation also only supports a JSON payload, try supporting XML or any other content type.
To learn more about Redpanda, browse the Redpanda blog for more tutorials on how to easily integrate with Redpanda, or dive into one of the many free courses at Redpanda University.
If you haven’t already, try Redpanda for free! If you get stuck, have a question, or want to chat with the team and fellow Redpanda users, join the Redpanda Community on Slack.

Let's keep in touch
Subscribe and never miss another blog post, announcement, or community event. We hate spam and will never sell your contact information.


